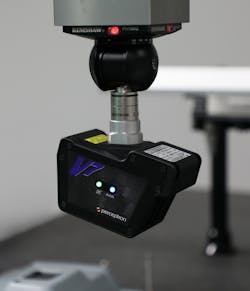
Coord3 These coordinate-measuring machines (CMMs) from Perceptron come in a variety of configurations, including bridge and gantry, so they are appropriate for inspecting parts in a range of sizes. The CMMs are made using advanced alloys and can be equipped with Perceptron laser-scanning sensors, as well as touch or scanning probes from Renishaw Inc.
What’s new? A new blue-laser scanner, the V7, that can measure as many as 1,280 points along its laser line at a rate of 50 hertz. It has a maximum width of field of about 3.5 inches and a maximum depth of field of about 3.9 inches. The scanner is appropriate for reverse-engineering of plastic parts or mold components, 3-D visualization and inspection. It can also be used to compare part point clouds to CAD reference drawings.
Benefits Fast, accurate, non-destructive data collection. With the new scanner’s blue laser, a Coord3 CMM can collect 64,000 data points per second, including data from dark and reflective surfaces.
Perceptron Inc., Plymouth, Mich., 734-414-6100, www.perceptron.com


